Simulation setup
This chapter describes how to setup your simulation once you have compiled your configuration at a chosen resolution.
Table of contents
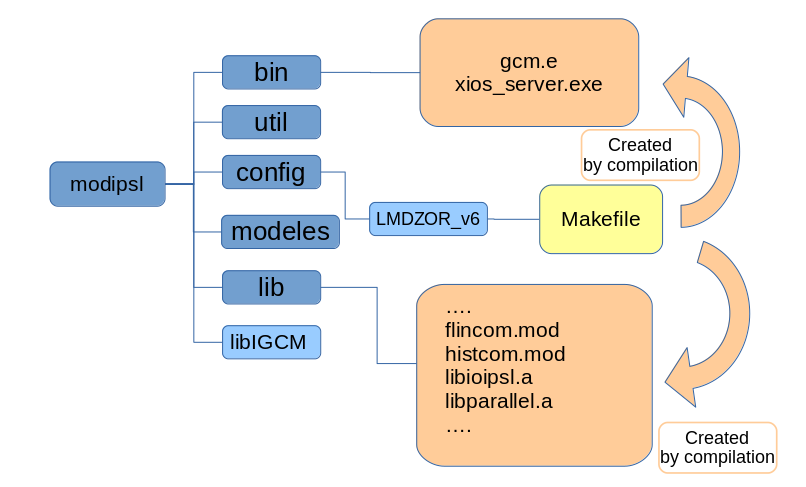
In this chapter, we suppose that you have followed the previous steps (installation and compilation). After the compilation, you should have the following tree view:

1. Create submission directory and main job
1.1. Create submission directory
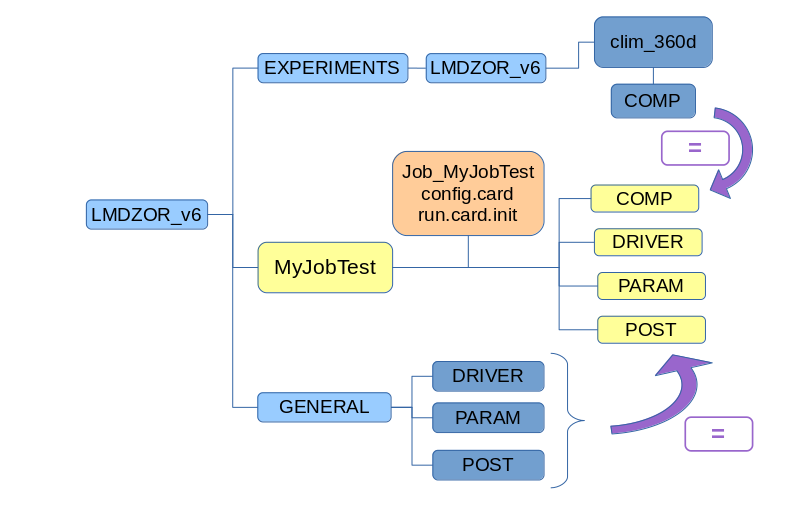
The configuration directory (modipsl/config/) contains tools to compile (Makefile and AA_make files) and tools to run a simulation (two directories (EXPERIMENTS and GENERAL) that allow you to create submission directories for your model configuration).
If one or several submission directories (e.g. EXP00, LMDZOR01, historical, OOL_SEC, etc...) have already been created, you can directly go to the next step.
- EXPERIMENTS : In this directory you will find several sub-directories for each experiment you can produce with the same executable. For example :
- for IPSLCM6 you can choose experiments between LMDZ, LMDZOR, IPSLCM, and IPSLESM;
- for LMDZOR_v6 you can choose experiments between LMDZOR et LMDZ;
- for LMDZORINCA_v6 you can choose experiments between LMDZ, LMDZOR and LMDZORINCA.
- GENERAL : In this directory you will find scripts and parameters files independent of the experiment (divided into 3 directories POST, PARAM and DRIVER).
Each of the sub-directories in EXPERIMENTS will contain a reference experiment (e.g. clim, amip... for LMDZOR, NMHC_AER, AER and GES... for LMDZORINCA, piControl, historical... for IPSLCM) and the file config.card which will be your simulation's initial setup.
To prepare your working directory you must know what kind of simulation you want to perform (i.e. choose a predefined experiment). Then, you must copy its own config.card file at the same level as the main Makefile.
For example, to perform a clim_360d experiment with LMDZOR_v6 configuration:
cd modipsl/config/LMDZOR_v6
cp EXPERIMENTS/LMDZOR/clim_360d/config.card .
ls
  AA_Make Makefile EXPERIMENTS GENERAL config.card

When you copied the config.card, you must change at least JobName field (your simulation's name) and check the Parallelization option (will depend of your resolution). In the following example, a simulation called MyJobTest is created:
#D-- UserChoices -
[UserChoices]
#============================
JobName=MyJobTest

#D- For each component,
ATM= (gcm.e, gcm.e, 71MPI, 8OMP)
SRF= ("", "")
SBG= ("", "")
IOS= (xios_server.exe, xios.x, 1MPI)
The standard parallelization options are:
- 144x142x79 => 71 MPI x 8 OMP + 1 MPI
- 96x95x39 => 31 MPI x 4 OMP + 1 MPI
Then run the ins_job script to create the submission directory. This directory will have the same name as JobName and the config.card file is moved in.
../../libIGCM/ins_job
ls
  AA_Make Makefile EXPERIMENTS GENERAL MyJobTest
When you launch ins_job command, it will ask you some questions :
- TGCC (irene) : (2 questions)
Hit Enter or give project ID (default is gencmip6), possible projects are gen2201 gen7719 gencmip6 :
=> indicate on which project you will work
ProjectID is gen2201 and ProjectNode for PostProcessing is standard
Hit Enter or give NUMBER OF CORES required for post-processing (default is "4"), possible numbers of cores are "1" to "48" :
=> choose the default except if you have some problem of time and memory - IDRIS (jean-zay) : ( 1question)
Hit Enter or give project ID (default is psl), possible projects are: genlsc01 subipsl psl
=> indicate on which project you will work
When you launched ../../libIGCM/ins_job, you will have the following new files and directories:

For more details about the ins_job script, you can have a look at the following sub-section.
To summarize to create a submission directory:
cd modipsl/config/LMDZOR_v6
cp EXPERIMENTS/LMDZOR/clim_360d/config.card .
vi config.card             ### Modify at least JobName=MYEXP
../../libIGCM/ins_job      ### Answer the questions
1.2. The script ins_job
ins_job is a script with 4 purposes :
- create a submission directory. This will only be done if ins_job is launched from a directory where EXPERIMENTS and GENERAL sub-directories are found;
- create a main job corresponding to a simulation. The main job is based on libIGCM/AA_job;
- create post-processing jobs in libIGCM using all other libIGCM/AA_* files;
- prepare the ensembles (optional, see section 6 bellow).
The script ins_job should be run directly from where the config.card is found (in the configuration directory or in the submission directory). Note that ins_job will never overwrite an existing job or directory.
The JobName and options about parallelization (number of cores per executable) are used to create the main job header (cf Main job of the simulation section bellow).
2. Contents of the submission directory
The contents of the new directory are described below.
cd MyJobTest
ls
  config.card COMP/ PARAM/ POST/ DRIVER/
2.1. config.card
The config.card file contains the settings of your simulation configuration. The file contains several sections with the simulation settings (e.g. name, duration, processors' number, post processing, initial state).
Below is a list of the file sections:
2.1.1. The [UserChoices] section
- JobName = simulation name
- ExperimentName = experiment name (following the CMIP6 nomenclature for the IPCC simulations)
- SpaceName = variable indicating the type of a simulation and where output will be store. Choose between :
- PROD = simulations store on storedir file system, under path IGCM_OUT/TagName/PROD
- DEVT = simulations store on storedir file system, under path IGCM_OUT/TagName/DEVT
- TEST = special case deactivating pack and storage. Simulations store on scratch file system, under path IGCM_OUT/TagName/TEST
- LongName = description of your simulation
- TagName = do not change this field; describes to which configuration family your experiment belongs
- ExpType = do not change this field; allows you to find the EXPERIMENTS directory in which you are working
- CalendarType= define the type of calendar for a year of simulation. Choose between :
- 360d = idealized calendar of 12 months of 30 days
- leap = real calendar of 365 and 366 days
- noleap = idealized calendar of 365 days
- DateBegin = simulation start date (yyyy-mm-dd)
- DateEnd = simulation end date. It must be the last day "included" in your simulation
- PeriodLength = frequency of the executable run. This parameter can be 1M, 1Y or 10Y (1D or 5D for a test)
- ARCHIVE = optional: path to base directory for output files. By default this is set in libIGCM depending on the machine. This variable is suggested to be used at obelix to change the default output directory which is /home/scratch01/login.
- DataProject = optional: This variable can be added currently only for use at irene if you want to store output on another project space than the one used in the job headers. The main job and all post-processing jobs will store at this project even if the computing hours are taken from another project. Note that by default the storage space is the same as the computing project. For example DataProject=gen6328.
- CompressionLevel = choose level of compression for netcdf output files. Default level is 2 in order to have the best compromise between fast compression/uncompression and small compression. Levels from 0 (no compression) to 9 are available. Note that we are only dealing with lossless compression, so that every bit of the original data can be recovered.
The parameters ExperimentName and SpaceName are optional. They impact on the path to the storage directory for the simulation output. SpaceName=TEST is a specific case which deactivate pack and storage at archive directory which means that the output will be stored only at SCRATCHDIR (at TGCC and at IDRIS).
Example 1: With a ExperimentName and SpaceName=TEST
JobName=MyJobTest
ExperimentName=DIADEME
SpaceName=TEST
TagName=LMDZOR
The output directory will be IGCM_OUT/LMDZOR/TEST/DIADEME/MyJobTest.
Example 2: without ExperimentName and SpaceName
JobName=MyJobTest
TagName=LMDZOR
The output directory will be IGCM_OUT/LMDZOR/MyJobTest.
The character "_" is not allowed in the variables JobName, ExperimentName and SpaceName
PeriodLength allows you to determine the integration length of an execution for your configuration (restart files creation frequency)

A simulation is a succession of NbPeriodsPerJob periods, PeriodLength parameter allow to determine the size of each period. At the end of each period the simulation will create outputs and restart files. Restart files will be use to initial the next period of simulation.
If SpaceName=TEST all output will be store on $SCRATCHDIR (at TGCC) or $WORKDIR (at IDRIS)
2.1.1.1. UsersChoices Specific to v6.2
- EnvFile = path of the file using for install compilation environment
- ResolAtm = resolution of atmosphere model LMDZ (need to find the executable name)
- ResolOce = resolution of ocean model NEMO (need to find the executable name)
- ConfChem = configuration choose for the chemistry atmospheric model INCA (AER, NMHC, etc.) (need to find the executable name)
- OptMode = option use for the compilation (debug or prod)(need to find the executable name).
2.1.2. The section [Executable]
This section contains one line for each model component giving the executable's name in the bin/ directory, the executable's name copied to the working directory and resource specifications. You should only change this section if you have changed the executable's name.
Note : (",") indicates that this component has no executable. It is defined in a library linked to another executable (e.g. Orchidee in LMDZOR or Inca in LMDZINCA).
Example for an MPMD MPI execution with NEMO and XIOS : Ocean on 127 MPI processes and IO Server on 1 MPI processes.
[Executable]
#D- For each component, Real name of executable, Name of executable in RUN_DIR directory, Number of MPI processes, Number of OpenMP threads
OCE= (opa, opa.xx, 127MPI)
ICE= ("" ,"" )
MBG= ("" ,"" )
IOS= (xios_server.exe, xios.x, 1MPI)
Example for an MPMD hybrid MPI/OpenMP execution with IPSLCM coupled configuration : Atmosphere on 27 MPI processes and 4 OMP threads per processes, Ocean on 19 MPI processes, IO Server on 1 MPI processes.
[Executable]
#D- For each component, Real name of executable, Name of executable in RUN_DIR directory, Number of MPI processes, Number of OpenMP threads
ATM= (gcm.e, lmdz.x, 27MPI, 4OMP)
SRF= ("" ,"" )
SBG= ("" ,"" )
OCE= (opa, opa.xx, 19MPI)
ICE= ("" ,"" )
MBG= ("" ,"" )
CPL= ("", "" )
IOS= (xios_server.exe, xios.x, 1MPI)
Another example for an MPMD hybrid MPI/OpenMP execution with LMDZ and XIOS : Atmosphere on 47 MPI processes, 8 OMP threads per processes and and IO server on 1 MPI processes.
[Executable]
#D- For each component, Real name of executable, Name of executable in RUN_DIR directory, Number of MPI processes, Number of OpenMP threads
ATM= (gcm.e, lmdz.x, 47MPI, 8OMP)
SRF= ("" ,"" )
SBG= ("" ,"" )
IOS= (xios_server.exe, xios.x, 1MPI)
Example for an SPMD hybrid MPI/OpenMP simulation with LMDZ : Atmosphere on 32 MPI processes and 4 OMP threads per processes.
[Executable]
#D- For each component, Real name of executable, Name of executable in RUN_DIR directory, Number of MPI processes, Number of OpenMP threads
ATM= (gcm.e, lmdz.x, 32MPI, 4OMP)
SRF= ("" ,"" )
SBG= ("" ,"" )
2.1.3. The [Restarts] section
The Restarts section allows to start a simulation from another existing simulation. This simulation can be found at the archive machine or at local scratch- or workdir. Activate by setting OverRule=y. All components (e.g. ATM, SRF, etc) will then use the same simulation as restart state.
[Restarts]
OverRule=y
RestartDate=2319-12-31                                  # Last day of the experience used as restart for all components
RestartJobName=CM607-LR-pdCtrl-01                       # Define restart simulation name for all components
RestartPath=${R_IN}/RESTART/IPSLCM6/DEVT/pdControl      # Path Server Group Login
The root path for the RestartPath depends of the computing center (details about file systems at TGCC and IDRIS). They can be:
${ARCHIVE}                           # The storage machine of the computing center.
                                     # This space can contain tar of restarts or
                                     # usual restarts files.
                                     # TGCC : ${STOREDIR}
                                     # IDRIS : ${STORE}

${SCRATCHDIR}                        # The large TGCC workspace (no backup).
                                     # This kind of space can contain usual
                                     # restarts files.

${SCRATCH}                           # The large IDRIS workspace (no backup).
                                     # This kind of space can contain usual
                                     # restarts files.
On both computing centers (TGCC and IDRIS), if you have multiple projects you will have one unique login connected to all your projects. Thus you will have have a home, a storedir, a workdir and a scratchdir by project
libIGCM manages the difference in treatment between a path pointing to restart files that are directly accessible (without pack) and a path pointing to restart files that are in tar format (after pack). The management is made according to the path you provided.
2.1.4. The [ATM], ..., sections of the model components
This section for each of the model components allows you to:
- define the output frequency;
- define whether this component is installed which will only be considered if you specified OverRule=n in the #TheRestartssection Restarts section.
The possible settings for the RestartPath options are the same as for the [Restarts] section.
The possible settings for the WriteFrequency options depends of the component :
- LMDZ on config v6.1 : [ATM]
- 1M (monthly)
- 5D (5-day)
- 1D (daily)
- HF (6-hour high frequency)
- HF3h (real-time 3-hour frequency - specific to LMDZ)
- HF3hm (3-hour averaged high frequency - specific to LMDZ)
- STN (instantaneous output only for the CFMIP stations - specific to LMDZ).
[ATM]
WriteFrequency="1M 1D"                                  # Activate the writing frequency of this component
Restart=y                                               # If config_Restarts_OverRule == 'n' next 4 params are read
RestartDate=2319-12-31                                  # Last day of the experience used as restart for this component if Restart=y
RestartJobName=CM607-LR-pdCtrl-01                       # Define restart simulation name for this component
RestartPath=${R_IN}/RESTART/IPSLCM6/DEVT/pdControl      # Path Server Group Login
- LMDZ v6.2 : this secion is not used anymore. You can manage the output frequency since COMP/lmdz.card
- INCA : [CHM] more details here
- ORCHIDEE : [SRF] and [SB] these sections are not used anymore. You can manage the output frequency since COMP/orchidee.card and COMP/Sechiba.card. Read comments to understand.
- NEMO : [OCE] this secion is not used anymore. You can manage the output frequency since COMP/opa9.card
2.1.5. The [Post] section
The options of the [Post] section will allow you to set or disable the frequencies for submitting post processing jobs by changing the 5 following options (see the diagram below).
If you do not wish to run post processing jobs, you must specify NONE for both TimeSeriesFrequency and SeasonalFrequency.
PackFrequency should not be disabled except in the case of running with SpaceName=TEST.

RebuildFrequency=NONE        # No use anymore except in few specific cases
PackFrequency=1Y             # If absent default to RebuildFrequency.
TimeSeriesFrequency=1Y       # Frequency of post-processing submission (NONE if you don't want)
SeasonalFrequency=2Y         # Seasonal average period (NONE if you don't want,
                             # 2Y at least, 10Y by default)
SeasonalFrequencyOffset=0    # Offset for seasonal average first start dates ;
                             # same unit as SeasonalFrequency
Note: the complete duration of the simulation should be an integer multiple of the PackFrequency value for packs to be correctly generated. If this is not the case, e.g. if you run 25 years with a PackFrequency of 10Y, the last five years will be left unpacked. To solve this issue, you have to run your simulation in two parts. In the example given, begin by running the twenty first years with PackFrequency=10Y, setting the end date of your run to the end of these twenty years. Once the first part is computed, switch to PackFrequency=5Y, change the end date to the final date in run.card, set the PeriodState to OnQueue, and re-submit your job. For even odder cases, the run might be more than twofold: for example, scenario runs will cover 86 years, which should be split into 10Y + 5Y + 1Y. (see https://forge.ipsl.fr/igcmg/wiki/IPSLCM6/IPSL-CM6A-LR#Proc%C3%A9durepourfinirunhistoricalouunscenario)
2.2. COMP directory

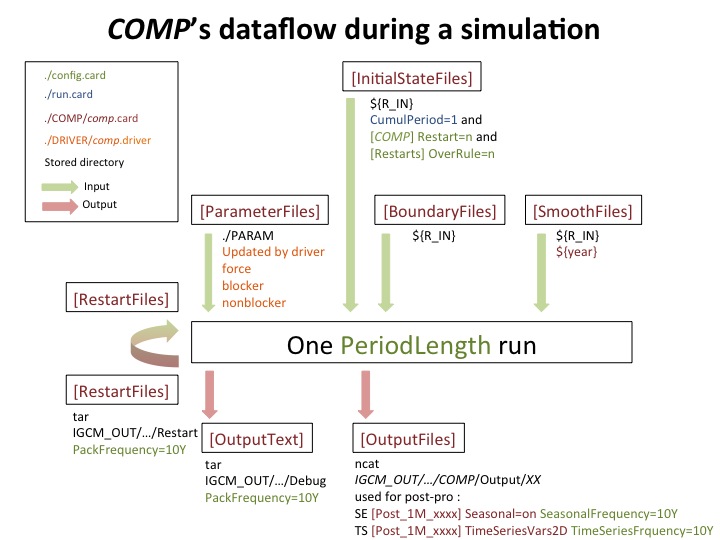
This directory contains the architecture (or map) of each model component. Each map specifies inputs and outputs required by a component.
Input files of each component are organized into different sections.
- [UserChoices] contains specific options. --> used by the component's drivers (e.g.: lmdz.driver)
- [InitialStateFiles] Initial conditions files such as vegetation maps, topography,... --> retrieved by the IGCM_comp_GetInputInitialStateFiles function
- [BoundaryFiles] Boundary conditions files such as forcings or a LAI --> retrieved by the IGCM_comp_GetInputBoundaryFiles function
- [SmoothFiles] Time-varying boundary conditions files such as aerosols --> retrieved by the IGCM_comp_GetInputSmoothFiles function
- [ParametersFiles] Parameters files such as namelist or the run.def file --> retrieved by the IGCM_comp_GetInputParametersFiles function
- [RestartFiles] Restart files --> retrieved by the IGCM_comp_GetInputRestartFiles function
2.2.1. The [UserChoices] section
Contains several options which change the simulation setup by drivers files of the components (lmdz.driver, opa9.driver, ...). For example :
[UserChoices]
# Physics package to use :
# LMDZ_Physics=AP for standard/old physics(default), can be used with LMDZ4_AR5 or LMDZ5/trunk sources
# LMDZ_Physics=NPv3.1 for new physics, to be used with LMDZ5/trunk revision 1554 or later
LMDZ_Physics=AP
See the description for LMDZ here.
See the description for INCA here.
See the description for ORCHIDEE here.
See the description for NEMO here.
2.2.2. The [InitialStateFiles] section
Files needed to create initial files. This section is not activated if you chose to start or continue from an existing simulation (Section [Restart] in config.card). The files in this list will be only copied at the startup of your simulation.
# ------------------------------------------------------------------
#D- Get initial state (Etat0, carteveg,relief...)
#D- READ AND USE BY GCM FOR ONLY FOR THE FIRST EXECUTION.
# ------------------------------------------------------------------
[InitialStateFiles]    # IGCM_comp_GetInputInitialStateFiles from main Job
List= (SOURCE, DESTINATION)
2.2.3. The [BoundaryFiles] section
The files containing the boundary conditions are copied to the working directory.
The files in the List list will be copied at each integration period. You can use variables ${year} and ${month} in the path of your files.
List=   (${R_IN}/ATM/AEROSOLS/CMIP6/v1/${RESOL_ATM_XY}/L${RESOL_ATM_Z}/aerosols${year}_from_inca.nc,         aerosols${year}.nc),\
        (${R_IN}/ATM/OZONE/UReading/historical.v20160711.v2/interpol/${RESOL_ATM_XY}/climoz_LMDZ_${year}.nc, climoz_LMDZ.nc)    ,\
        (${R_IN}/ATM/SOLAR/CMIP6/v3.1corr/Historical/solarforcing_v3.1_daily_6bands_${year}.nc,              solarforcing.nc)   ,\
        (${R_IN}/ATM/STRATAERO/CMIP6/v3/${RESOL_ATM_XY}/L${RESOL_ATM_Z}/taulwstrat.2D.${year}.nc,            taulwstrat.2D.nc)  ,\
        (${R_IN}/ATM/STRATAERO/CMIP6/v3/${RESOL_ATM_XY}/L${RESOL_ATM_Z}/tauswstrat.2D.${year}.nc,            tauswstrat.2D.nc)
The files in the ListNonDel list will only be copied for the first period of each job. These files will be accessible but will not change during the simulation.
# ------------------------------------------------------------------
#D- Get Boundaries Conditions (SST, WIND[X,Y,Z], LAI ...)
#D- READ AND USE BY GCM AT EACH EXECUTION.
# ------------------------------------------------------------------
[BoundaryFiles]        # IGCM_comp_GetInputBoundaryFiles
List=   (SOURCE, DESTINATION)
ListNonDel= (SOURCE, DESTINATION)
Be very careful : if there is any space at the end of a line, libIGCM will not take in account the next line in the list
2.2.4. The [SmoothFiles] section
These are also files containing boundary conditions but their retrieval is only done at specific time integrals and it is not systematic. 1:12: means that the file will be copied to the working directory at the first integration step and then every 12 iterations until the simulation is finished.
[SmoothFiles]          # IGCM_comp_GetInputSmoothFiles
List= (SOURCE, DESTINATION, A:B:C)
A:B:C describes when to copy the files, where A=first cumulPeriod to copy, B=frequency of update, C=last cumulPeriod of copy. If C is not set, the copy will be done until the end of the simulation.
Remark: As the CumulPeriod is used in the syntax for the periods (A and C), if changing the DateBegin, the section SmoothFiles must be changed as well.
For example using a data-set available for years 1850-2020:
In config.card:
DateBegin=1701-01-12
DateEnd=1900-12-31
PeriodLength=1Y
In stomate.card
[SmoothFiles]
List=   (${R_IN}/SRF/NITROGEN/N_DEPOSITION/CMIP6.2/historical/nhx_1850.nc,    Nammonium.nc, 1:150:150),\
        (${R_IN}/SRF/NITROGEN/N_DEPOSITION/CMIP6.2/historical/nhx_${year}.nc, Nammonium.nc, 151:1:200)
The first line will copy file nhx_1850.nc and rename it to Nammonium.nc in the RUN_DIR. This copy will be done at first CumulPeriod and until CumulPeriod=150. The middle 150 means that the file will not be updated, it'll always be there but copied only when starting a new job (no coping between years within a job).
The second line will copy file nhx_${year}.nc rename it to Nammonium.nc from CumulPeriod=151 until CumulPeriod=200. The frequency of update is 1, so each year the file will be updated (using corresponding $year).
2.2.5. The [ParametersFiles] section
The parameter files of the component (namelist, run.def,...)
# ------------------------------------------------------------------
#D- Get parameters text files updated by job (.def, namelist ...)
#D- READ AND USE BY GCM AT EACH EXECUTION.
# ------------------------------------------------------------------
[ParametersFiles]      # IGCM_comp_GetInputParametersFiles
List=   (SOURCE, DESTINATION)
2.2.6. The [RestartFiles] section
The files providing the restart data. You must not change this section it is needed to link the jobs.
# ------------------------------------------------------------------
#D- Get restart files (restartphy.nc, orca_restart.nc ...)
#D- READ AND USE BY GCM AT EACH EXECUTION.
# ------------------------------------------------------------------
[RestartFiles]         # IGCM_comp_GetInputRestartFiles
List=   (MODEL OUTPUT NAME, ARCHIVED NAME, MODEL INPUT NAME)
2.2.7. The [OutputText] section
This section contains text files which will be produced during the simulation and model input parameter files. You might want to save these files.
[OutputText]
List= (NAME OF TEXT1 FILE, NAME OF TEXT2 FILE ....)
These files will be saved in tar stored in the output directory
- TGCC :
$CCCSTOREDIR/IGCM_OUT/TagName/[SpaceName]/[ExperimentName]/JobName/DEBUG
- IDRIS :
$STORE/IGCM_OUT/TagName/[SpaceName]/[ExperimentName]/JobName/DEBUG
2.2.8. The [OutputFiles] section
The netcdf files produced by the simulation are listed in this paragraph. This paragraph is associated with the [Post_*] sections.
[OutputFiles]
List = (OUTPUT_FILE_NAME, SAVE_PATH, POSSIBLE ASSOCIATED POST PROCESSING)
Example
[OutputFiles]
List=   (histmth.nc,       ${R_OUT_ATM_O_M}/${PREFIX}_1M_histmth.nc,       Post_1M_histmth),       \
        (histmthCOSP.nc,   ${R_OUT_ATM_O_M}/${PREFIX}_1M_histmthCOSP.nc,   NONE)
Before store output files libIGCM will launch a pack to concatenate them.
Refer to this chapter to learn everything about the [Post*] section.
2.3. DRIVER directory
This directory contains the different drivers (predefined libIGCM functions for the component) of the different configuration's components. These drivers modify the parameter files of each component (*.def, namelist, ...) setting the integration times, the outputs, and the forcing files.
Note : If this directory does not exist the driver files are located in the COMP directory.
2.4. PARAM directory
This directory contains input text files for the configuration's components such as parameter lists, namelist and main xml file. Other xml files are copied directly from the modeles direcories.
In the parameter files and xml files, some of the variables will be modified after the job has been submitted. This is done by the COMP/comp.driver, for example lmdz.driver or orchidee.driver. For the components LMDZ, ORCHIDEE, INCA or DYNAMICO, only variables set equal _AUTO_ or _AUTOBLOCKER_ can be modified. No variable can be modified without having one of these key words. The values for these variables are set according to the options from config.card or COMP/comp.card, for exemple lmdz.card.
A variable which is set to _AUTO_ can also be changed manually in the corresponding file in the PARAM directory. For this case, the driver can not change it again. Some variables are set equal _AUTOBLOCKER_. They cannot be changed. If still they are changed, the job will exit with error message.
2.5. POST directory
This directory contains configuration files for additional diagnostic output. Click here for more details.
3. Set up initial state for the simulation
When you setup a simulation make sure that the list of input files in each card file of the model components and the selected options correspond to your experiment.
There are three different ways to define your simulation's initial conditions:
- Start using restart files from an existing simulation by setting OverRule=y in the [Restart] section of the config.card file
- Start using different restart files from different simulations for each model component by setting Restart=y in each associated part of the config.card file. OverRule=n must be set in config.card.
- Use the default section InitialStateFiles in the comp.card file of the model components in config.card you must have OverRule=n and and Restart=n for this case.
3.1. Example for different restart
3.1.1. Example with OverRule=y
If you wish to use the start state of a given simulation, set in config.card:
#========================================================================
#D-- Restarts -
[Restarts]
#D- If you want a GENERAL RULE FOR ALL COMPONENTS RESTARTS, put this flag to 'y'
OverRule=y
#D- Last day of the experience used as restart
RestartDate=1869-12-30
#D- Define restart simulation name
RestartJobName=CD1
#D- Path Server Group Login
RestartPath=${ARCHIVE}/IGCM_OUT/IPSLCM5A/DEVT/pdControl
For the same case but if the simulation was performed by someone else, you must give the complete path of the directory, for example:
RestartPath=$STORE/../../lab/plabxxx/IGCM_OUT/IPSLCM5A/DEVT/pdControl
3.1.2. Example with OverRule=n and [COMP]/Restart=y
You can also distinguish the setup parameters for each model components. Set OverRule=n and use the Restart, RestartDate, RestartJobName and RestartPath parameters for each model component (section). For example, use restart files for the atmosphere but not for the surface component. For the surface component the InitialStateFiles will then be used :
#D-- ATM -
[ATM]
#
WriteFrequency="1M 1D HF"
# If config_Restarts_OverRule == 'n' all params are read
Restart= y
# Last day of the experience used as restart for this component
RestartDate=1999-12-30
# Define restart simulation name
RestartJobName=2L18
RestartPath=${ARCHIVE}/IGCM_OUT/IPSLCM5A/DEVT/pdControl
#
#D-- SRF -
[SRF]
#
WriteFrequency="1M"
# If config_Restarts_OverRule == 'n' all params are read
Restart= n
# Last day of the experience used as restart for this component
RestartDate=1999-12-30
# Define restart simulation name
RestartJobName=2L18
RestartPath=${ARCHIVE}/IGCM_OUT/IPSLCM5A/DEVT/pdControl
4. Main job of the simulation
The main job contains scripts that will be executed by the system. With libIGCM, this job is unique (with the name Job_MYJOBNAME) for all type of configurations. It contains all scripts to initialize a simulation, to summarize the chosen model configuration and to run identical experiments for all model components. It resubmits itself in order to continue the simulation if needed.
The job header depends of the machine type. It contains the job name and the parameters.
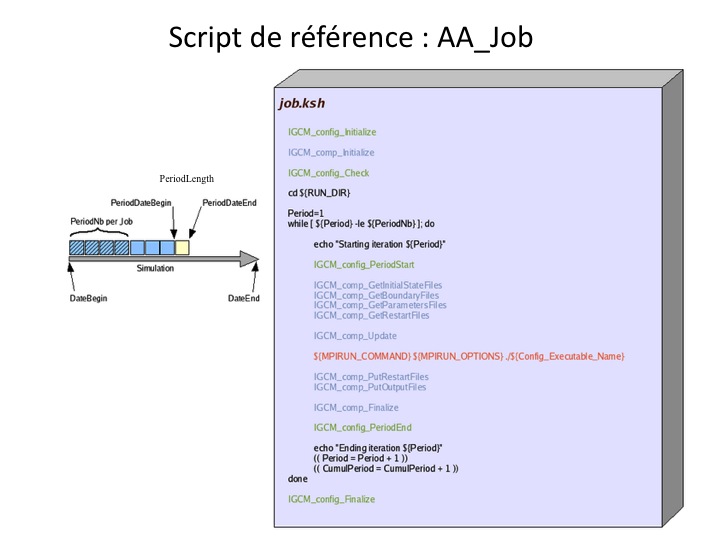
You should change the NbPeriodsPerJob parameter in the job to change the number of runs in one job (see the example of computation in the next section) :
#D- Number of execution in one job
NbPeriodsPerJob=10
A temporary run directory (on the scratch for Irene and Jean Zay) will be created for the execution of the job.This directory is always removed after successful run but when the job run fails it depends on the system if the directory is kept or not. Therefore you can change the default location by setting RUN_DIR_PATH variable as you like. This is very useful for debugging.
#D- Define running directory
#D- Default=${TMPDIR} ie temporary batch directory
#RUN_DIR_PATH=/workdir/or/scratchdir/of/this/machine
Here is the diagram of the steps in the template script (AA_job) that will be use to create the job file:

4.1. Job headers
Job headers, with their different lines and submission options, are detailed in sections Irene headers and JeanZay headers.
4.2. Choosing NbPeriodsPerJob (previously PeriodNb)
Before the revision 1607 of libIGCM the parameter NbPeriodsPerJob was calling PeriodNb
To avoid starting a lot of short jobs which might be queued, the production job starts n integrations (NbPeriodsPerJob), whose length are PeriodLength.
These are calculated as followed:
Time limit = NbPeriodsPerJob * max(Real time of a PeriodLength)
where Time limit is the requested time in the job header.
At the end of a simulation, the run.card file returns the used CPU time for each simulation step. This will allow you to perform this computation. It is therefore important, for each simulation with a new configuration, to perform a 1-3 month test to estimate beforehand the CPU time.
5. Prepare a new experiment
There are two ways to prepare a new working directory for your model configuration:
- Start again from the first step described above by copying the desired config.card file to your configuration directory using a new JobName.
- Copy an existing submission directory, delete the files created by the simulation, and change JobName in config.card.
For example:
cd modipsl/config/LMDZOR_v6
cp -r MyJobTest CHOUCROUTE
cd CHOUCROUTE
rm -f Job_MyJobTest run.card Script_Output_MyJobTest.000001
vi config.card
   JobName=CHOUCROUTE
../../../libIGCM/ins_job # Check and complete job's header
The ins_job script allows you to create a submission directory from a config.card file or if the directory already exists it allows you to only create the job corresponding to config.card. ins_job will not overwrite a directory or an existing job.
5.1. Post-processing jobs
Jobs headers for post-processing have to be carefully checked, especially elapsed time limits. They are in libIGCM directory (xxx.job), they are create when you launch for the first time the command ins_job to create an experiment. Change time limits if you use larger frequencies.
6. Prepare ensembles with ins_job -e
For details about how to generate/use ensemble simulation, please go to its specific page.
Attachments (8)
- AA_JOB.ppt (208.5 KB) - added by trac 10 years ago.
- AA_job.jpg (51.7 KB) - added by trac 10 years ago.
- COMP dataflow.jpg (84.9 KB) - added by mafoipsl 9 years ago.
- dataflow for doc.ppt (183.5 KB) - added by mafoipsl 9 years ago.
- creation_exp_v6.png (22.9 KB) - added by falletti 5 years ago.
- compilation.png (49.0 KB) - added by falletti 5 years ago.
- ins_job_v6.png (43.5 KB) - added by falletti 5 years ago.
- simulation_periodLength.png (73.2 KB) - added by acosce 5 years ago.
Download all attachments as: .zip
