General information on installing and running the model
1. Getting & installing the model
1.a retrieving the sources (svn)
The iloveclim model and running bash scripts are hosted on the forge at IPSL in a subversion server. To retreive it, you need an account on the forge and to be added to the ludus project -> ask didier.roche[AT]lsce.ipsl.fr for terms.
- To get the iLOVECLIM code with svn:
svn co svn+ssh://forge.ipsl.jussieu.fr/ipsl/forge/projets/ludus/svn/trunk iloveclim/.
After checkout the first thing to check is wether the computer you want to install it on is already supported.
|
1.b supported machines
To know which machines are supported by default, go to your iloveclim/config directory and look for file named fconfig.*.
At time of writing we have:
.rw-rw-r-- 365 roche 25 nov.  10:10 fconfig.lisa
.rw-rw-r--  57 roche 25 nov.  10:10 fconfig.sadira023
.rw-rw-r-- 202 roche 25 nov.  10:10 fconfig.dmrpwl-computer
.rw-rw-r-- 327 roche 25 nov.  10:10 fconfig.irene
.rw-rw-r--  57 roche 25 nov.  10:10 fconfig.lsce3027
.rw-rw-r-- 154 roche 25 nov.  10:10 fconfig.obelix.alt
.rw-rw-r--  60 roche 25 nov.  10:10 fconfig.dmrpwl
.rw-rw-r-- 276 roche 25 nov.  10:10 fconfig.lsce3194
.rw-rw-r-- 174 roche 25 nov.  10:10 fconfig.obelix
indicating the different machines supported. Most well known in this list are the local or national clusters: obelix medium sized LSCE cluster, irene the national french TGCC cluster, lisa one of the dutch surfsara universities cluster. Other keys like sadira023 are personal computers of some members.
|
1.c adding a new supported machine
In case your computer is not in the list of supported ones, the easiest is to copy one existing and to tailor a new one corresponding to your machine's system.
Let's have a look at the content of one fconfig file (source:trunk/config/fconfig.lisa):
   ifort
   /hpc/eb/compilerwrappers/compilers
   /sw/arch/Debian10/EB_production/2020/software/netCDF/4.7.4-iimpi-2020a/include
   /sw/arch/Debian10/EB_production/2020/software/netCDF/4.7.4-iimpi-2020a/lib
   /sw/arch/Debian10/EB_production/2020/software/netCDF-Fortran/4.5.2-iimpi-2020a/include
   /sw/arch/Debian10/EB_production/2020/software/netCDF-Fortran/4.5.2-iimpi-2020a/lib
The lines define the system as follow:
- the compiler to be used. At time of writing, gfortran, ifort and pgfortran/nvhpc are used routinely, but gfortran cannot be used in production due to some discrepancies in the results.
- the path to the directory where the compiler is on the system (on simple systems, which ifort will give you that path
- the path to the include directory for the netCDF library that matches your compiler
- the path to the library directory for the netCDF library that matches your compiler
- the path to the include directory for the netCDF-Fortran library that matches your compiler
- the path to the include directory for the netCDF-Fortran library that matches your compiler
Lines 5. & 6. are optional, since some systems put them in the same path as the C libraries indicated with 3. & 4., some not. If 5. & 6. are not present, it will be assumed that the netCDF-Fortran libraries are in 3. & 4.
1.d loading necessary modules [system dependent]
On some systems, many options are available for compilers, netCDF libraries etc. These are generally handled through modules loads.
For obelix at LSCE we currently (2022-11-25) use:
   module purge
   module load intel-fcomp/2020 netcdf/4
For lisa at surfsara.nl we use (2022-11-25):
   module load 2020
   module load iimpi/2020a
   module load netCDF/4.7.4-iimpi-2020a
   module load netCDF-Fortran/4.5.2-iimpi-2020a
... and so on and so forth.
2. Installing the model and checking the install
2.a Running the install script [simple form]
The whole installation process is automated through a bash script. You can install as follow:
  cd iloveclim
  ./New_install_ludus.sh
This will install all the default component, but no additional ones (see 2.b). The script will report success and failures in the installation package.
An example of a failed install:

2.a Running the install script [with extended components]
or with extended components (grisli...)
<--- Update of webpage stops here 2022-11-25 dmr >
-- OLD version (deprecated)
http://forge.ipsl.jussieu.fr/ludus/wiki/basicInstall
3. Running iLOVECLIM
3.a. To run a simple simulation
- One year run (test)
You can start by running a one year test (by default it runs for 1 year). It will copy all the files in the wkdir directory, compile and run the simulation.
./bin/run-iloveclim
If everything is ok it should have run.
- To get the help and details on the different options:
./bin/run-iloveclim -h
Some options:
-n number of years of the simulation (here 10 years)
-r frequency of the restarts (here written every 10 years)
-k to remove the old files
-v to write info
- Interactive run: this will create the proper directories, compile and run.
To start a run interactively on obelix, with a simulation called LH which lasts 500 years and writes restart files every 250 years, starting from the default initial conditions:
./bin/run-iloveclim -l LH -n 500 -r 250
To keep the simulation running even if the terminal is closed, and redirects the terminal outputs to a file:
nohup ./bin/run-iloveclim -l LH -n 500 -r 250 > run_LH &
3.b For developers
You can create the directory in your work directory and copy all the files without compling nor running with the -z option:
Exemple:
./bin/run-iloveclim -l PI-test -n 10 -r 10 -z -k -v 1
To compile and run you then have to go to the work directory.
First to compile:
cd wkdir/PI-test_ecbilt_clio/compil/
make
Then go to the run directory, create a soft link and run:
cd ../run/
ln -s ../compil/emic.x .
./emic.x
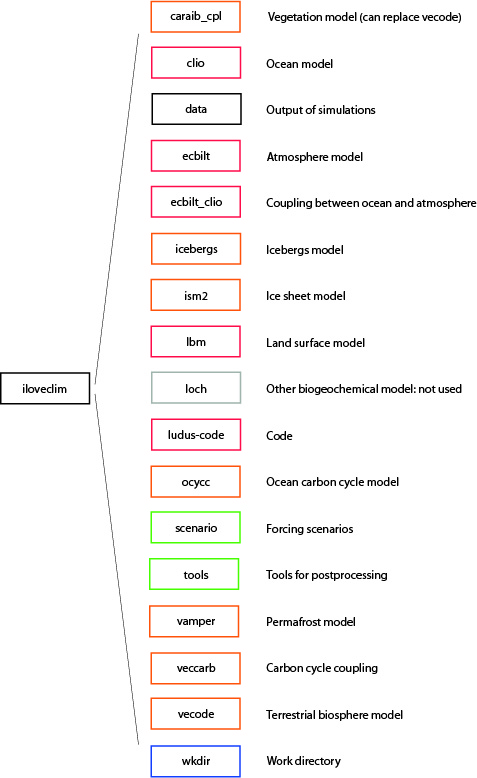
4. Useful directories and files
- wkdir/
This is your working directory with two directories:
wkdir/name_of_your_simulation/compil/sources contains all the source files of your simulation
wkdir/name_of_your_simulation/run/outputdata contains all the data outputs
- data/
At the end of your simulation, all the outputs can be found in data/name_of_your_simulation/outputTIME
While the simulation is still running, some outputs can be found in data/name_of_your_simulation/synced_files if you used a job allowing a synchronisation
- scenario/
You can use scenario directories to run with specific inputs, parameters or sources (rather than the default ones). Specify in your command line :
./bin/run-iloveclim -l PI-test -n 10 -r 10 -I scenario/scenario_name/inputdata -P scenario/scenario_name/parameters -F scenario/scenario_name/sources -z -k -v 1
- icTIME/ in data/ or wkdir/name_of_your_simulation/run/restartdata/resTIME/
To run your simulation with a specific restart (rather than the default one), specify in your command line :
./bin/loveclim-new-run -l PI-test -n 10 -r 10 -s TIME -S /home/path/to/iloveclim/data/name_of_restart_simulation/icTIME -z -k -v 1
Make sure than the TIME number in -s TIME does not start with 0.
5. Outputs
The outputs can be found in: workdir/NameOfYourSimulation_ecbilt_clio/run/outputdata or data/NameOfYourSimulation_ecbilt_clio/outputXXX.
Each composante of the model has its own output directory:
- global for global variables and info:
bookXXX is a text file with: year day global mean temperature (degrees)
- ocean for the ocean:
CLIO3_test0_ann_avrg_013910.nc is a netcdf file with 3D temperature, salinity...
- carbon for the carbon cycle:
C_reservoirs.txt is a text file with carbon contents
- each clio file has 100 years by default
- postprocessing: see help on previous page (Tools)
- run param can be changed
- netcdf out param to have more variables
Attachments (2)
- iloveclim_arborescence.jpg (745.0 KB) - added by nbouttes 5 years ago.
- Example-failed-install.png (114.2 KB) - added by roche 18 months ago.
Download all attachments as: .zip