| Version 20 (modified by gmattia, 7 years ago) (diff) |
|---|
Install the modelling framework (NEMO and XIOS)
Last edition: Wikinfo(changed_ts)? by Wikinfo(changed_by)?
1. Extract the NEMO code
Using your my_login /pw registered on this web site:
svn --username "mylogin" co http://forge.ipsl.jussieu.fr/nemo/svn/branches/2015/nemo_v3_6_STABLE/NEMOGCM
2. Extract and install XIOS
Diagnostic outputs from NEMO are handled by the third party XIOS library. Instructions on how to obtain and install the softward see ModelInterfacing/InputsOutputs.
When you compile NEMO you will need to specify the following cpp keys:
- key_iomput
- key_mpp_mpi (if you want to use "detached mode")
- key_xios2 if you wish to use XIOS2 in nemo_v3_6_STABLE. XIOS2 is the only version available in the trunk.
3. Setup your ARCH file
All compiler options in NEMO are controlled using files in NEMOGCM/ARCH/arch-my_arch_name.fcm where my_arch_name is the name of your architecture. It is recommended to modify an ARCH file from an architecture similar to your own architecture. You will need to set appropriate values for all of the variables in the file. the variables %NCDF_HOME, %HDF5_HOME and %XIOS_HOME should be set to the installation directories used above.
4. Compile and create NEMO executable
The main script to compile and create executable is called makenemo and located in the CONFIG directory. To identify the source code you need, to build the makefile and run it.
As an example, compile GYRE, with ifort on linux to create a MY_GYRE configuration:
cd NEMOGCM/CONFIG; ./makenemo –m my_arch_name –r GYRE -n MY_GYRE
After sucessful execution of the makenemo command, the executable name opais created in the EXP00 directory (in the example above, the executable is created in CONFIG/MY_GYRE/EXP00/opa)
More options
- –n [CONFIG]: for configuration name, existant or new config to install
- –m [COMPILER]: compiler choice (use files names in NEMOGCM/ARCH, see examples below)
- –h: help
- –r [REFCONFIG]: reference configuration as first guess when installing a new one
- –j[num]: number of processes to compile (-j 0:no compilation)
- –d [DIR]: NEMO subdirectory (not needed)
- –t [DIR]: temporary directory to store libraries
- -clean [CONFIG_NAME] : remove the Makefile and all the files created afterwards
At the first use, you need the -m option to specify compiler, its options and libraries, then for next compilation, it is assumed you will be using the same compiler.
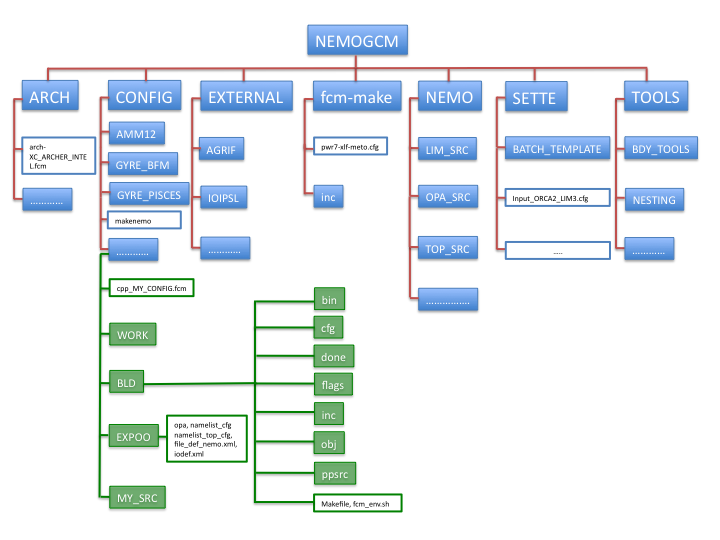
If –n option is not specified, ORCA2_LIM is the default configuration used. -d option has been implemented for use in non-interactive shell. The WORK directory is created under each configuration directory.
Tools used during the process
- functions.sh : bash functions used by makenemo, for instance to create the WORK directory
- cfg.txt : text list of configurations and source directories
- bld.cfg : FCM rules to compile
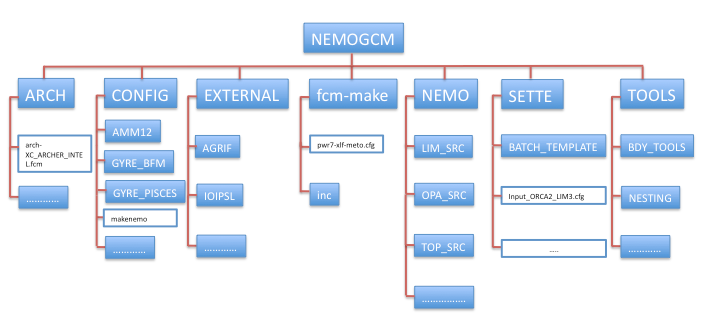
Description of directories
The image shows the directory tree (see * Documentation: wiki:Users/ModelInstall:nemogcm_tree.gif. 'TO MAKE NEW FIGURE (nemogcm_tree.gif) GELSOMINA'
- ARCH : compilation option files, with format arch_compiler.fcm, the compiler name has to be provided with –m option
- CONFIG : all configurations and a cpp.fcm file containing the list of CPP keys to each configuration
- EXTERNAL : package to implement an embbeded model (AGRIF)
- NEMO : source codes
- SETTE : package to make tests to ensure the reproducibility and restartability of the code after user changes
- TOOLS : useful softwares to different utilities. For example a tool under MPP_PREP computes the number of water processors for all possible decompositions (up to a maximum number of processors).
- fcm_make: 'TO ADD description GELSOMINA '
Examples
Compiling GYRE, with ifort on linux to create a MY_GYRE configuration
makenemo –m ifort_linux –r GYRE -n MY_GYRE
Recompile it
makenemo
Now, create and compile ORCA_LIM3
makenemo –n ORCA_LIM3 (and answer)
Now ORCA_LIM3_v2 based on the previous one
makenemo –n ORCA_LIM3_v2 -r ORCA_LIM3
Now, create and compile ORCA2_LIM_2_2, add (add_key) and delete (del_key) keys, based on ORCA2_LIM (just un example)
makenemo –n ORCA2_LIM_2_2 -r ORCA2_LIM del_key "key_iomput" (and answer)
To remove a bad configuration
makenemo –n ORCA2_LIM_2_2 clean_config (and answer)
5. Running the model
Once makenemo has run successfully, the opa executable is available in CONFIG/"MY_CONFIG"/EXP00
If no input file is expected, like for the simple "MY_CONFIG" configuration,
cd CONFIG/"MY_CONFIG"/EXP00
mpirun ./opa
If input file are needed, see the http://forge.ipsl.jussieu.fr/nemo/wiki/Users/ReferenceConfigurations
6. Viewing and changing list of active cpp keys
For a given configuration (here called "MY_CONFIG", the list of active cpp keys can be found in
NEMOGCM/CONFIG/"MYCONFIG"/cpp_"MY_CONFIG".fcm
This text file can be edited to change the list of active cpp keys. Once changed, one needs to recompile NEMO using the makenemo command in order for this change to be taken in account.
Attachments (2)
- nemogcm_tree.png (56.3 KB) - added by gmattia 7 years ago.
- nemogcm_tree_compiled.png (99.6 KB) - added by gmattia 7 years ago.
Download all attachments as: .zip